Background
When I got back into amateur radio after a lengthy hiatus (45 years), things had changed – a lot. Since I originally held a General ticket back in early 1970’s we’ve seen the rise of the Internet that connects every part of our world together, everyday computers so powerful it’s mind-boggling, digital technologies of every kind imaginable – oh yes, and Software-Defined Radios (SDR).
I was delighted and amazed at how the state of the art in amateur radio had progressed. During my ham radio blackout period, I was focused on military cryptographic systems, electronics, computer software and IT, along with raising a family and building several businesses. Finally, there’s some “me time” available for what I want to do…
Because we now live in a newer subdivision, the HOA like to control and limit about everything to maintain property values. This caused me to seriously evaluate my options for a remote station. This post begins to describe what turned out to be a journey of many months, designing and developing my remote station using a combination of SDR and traditional IT components.
When I began this project, I noticed there were a few articles around describing remote operation using SDR, but I found them lacking in enough specifics for me to design my own station. While I’m certain that this first SDR Remote Station I have built isn’t unique nor the best possible, it does work very well and has enabled me to hold QSO’s anywhere in the world – from anywhere in the world I have a decent Internet connection – which is just about everywhere.
As I have discussed the station design with hams around the world, I received a lot of questions and interest in the remote station design. It then occurred to me that what I have done by combining SDR with traditional IT techniques like VPN’s and wide area networking seems simple to me. But being an IT professional, I didn’t initially realize that many amateur radio operators may lack certain IT skills and experience that I take for granted and have used in the design of this station.
I will also provide credit for many of the design ideas I received from the extremely helpful Flex Radio community, who provided numerous suggestions and insights early on in my journey to SDR and remote operation, including this post on amplifiers, antennas and many other relevant recommendations that helped get me pointed in the right direction early on.
I hope this post is useful for those who are contemplating or embarking upon a remote station journey of your own. I consider this station design to be a “version 1” and plan to continue to evolve it with time, like most stations. Hopefully this and other related posts will provide you with some useful ideas and real-world insights I have gained along the way, saving you some time and expense, and making your remote station as enjoyable as mine is.
Anytime, Anywhere Amateur Radio
When I worked for a company named CITRIX as CTO, I saw firsthand the value of remote operation and “any device, any network, any location” computing. By separating the Windows user-interface from the underlying computing system, it yielded billions of dollars of value for CITRIX and our hundreds of thousands of customers, who leveraged remote access to business applications and desktops in amazing ways.
I see Software-Defined Radio in a similar way – separating the radio’s user-interface from the underlying radio system. But SDR goes a step further – it takes what has historically been a primarily analog device and makes it a primarily digital device. The combination of these two fundamental architecture changes radically alters what is possible.
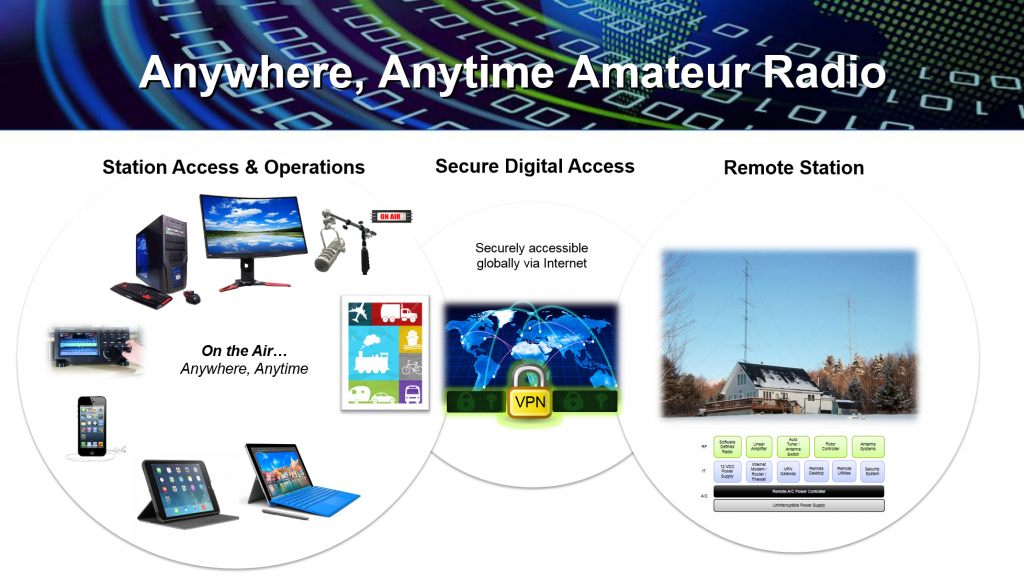
As shown below, separating the user-interface layer from the radio layer using Internet-compatible IP protocols provides tremendous flexibility, agility and new use cases. Station access and operations is now physically independent from the radio equipment and antennas, for example. The ability to leverage the global Internet means the radio is securely accessible from virtually anywhere. Separating the user-interface from the radio makes it possible to use many different devices to access the radio. And because the Internet is so ubiquitous, it’s easier to count the places you can’t use the radio than where you can (which is virtually everywhere).
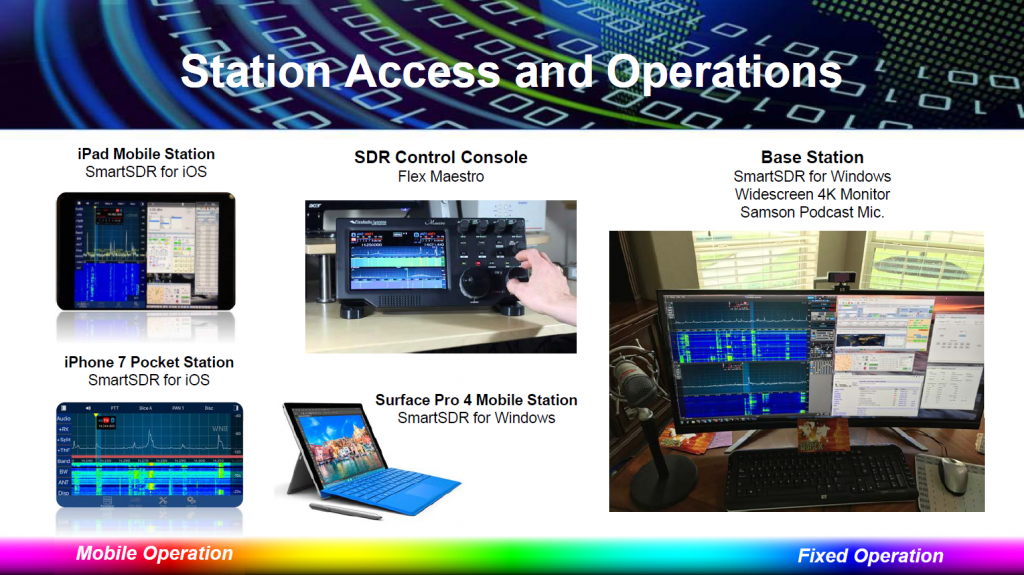
Above we see Station Access and Operations takes place from:
- Desktop PC’s with widescreen monitors (like the image of my base station at the start of this post)
- Specialized radio control consoles like the Maestro I use in my station
- Mobile access via an iPhone smartphone device
- Portable access via iPad and Surface Pro tablets
- Any Windows compatible device
I will cover the Remote Station architecture in more detail later in this post, along with the various components.
Secure Digital Access takes place through a secure VPN tunnel, an authenticated and encrypted connection that allows network traffic to pass between the station access devices and/or LAN, and the Remote Station’s LAN. Point-to-point VPN’s are commonly used by businesses to provide secure access to IT systems, networks and office locations by remote workers. Site-to-site VPN’s are commonly used to connect multiple physical office and data center locations’ networks together securely over the Internet. My station design supports both site-to-site (permanent) and point-to-point (temporary) VPN connections to the remote station.
As you can see, there’s now a full spectrum of use cases possible, spanning mobile and fixed operation modes. With a fixed operator station, you typically have high-quality audio from studio-quality USB microphones and headsets, amplified speakers and wide-screen, high-resolution monitors. With mobile stations, you trade off some of these things for increased mobility and flexibility.
Remote Station Components
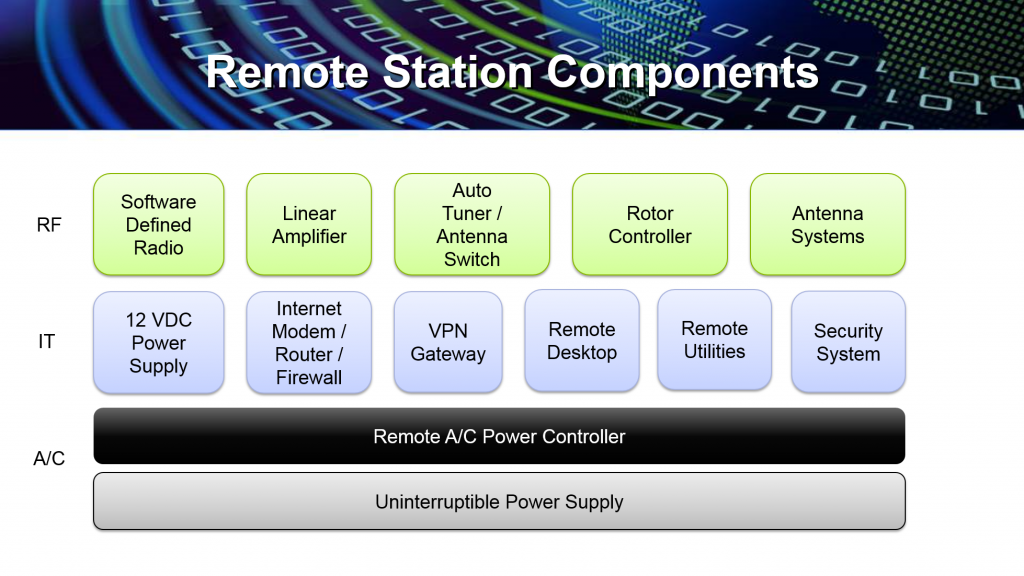
The following identifies Remote Station components that fall into three major categories:
- RF Components
- IT Components
- A/C Power Components
Each of these component areas is illustrated and covered in some detail below.
A/C Power Management
Let’s begin with the A/C power. One of the FCC requirements for remote station operation is the ability to maintain control over the transmitter. When your station is several hours (or more) away from your location, you definitely want to have remote control of the A/C power – and at a granular enough level to deal with most issues that can arise; otherwise, you’ll find yourself in the car (or on an airplane) going to do maintenance when you least expect it or want to.
I can tell you that several times when I had SWR issues I was forced to remotely power down the radio, which seemed to get stuck due to RF feedback (before I had proper filtering and other measures in place). Auto-tuners can cause common-mode currents (CMC), for example, to build up in USB cables that then infect the PC or network controller, temporarily blocking access to the remote radio. A sudden loss of Internet can also cause temporary access loss. If you happen to be transmitting at the moment these losses occur, you are no longer in control of your remote station (or its transmitter). So having control of the A/C power is extremely important with a remote station.
As shown above, I use a UPS to provide uninterruptible, clean power to the station. The UPS supplies all powered components with 120 VAC, except the amplifier, which gets is power direct; i.e., the amplifier by-passes the UPS and power controller due to current requirements in excess of what I was willing to invest in for the UPS and Power Controller.
The Remote A/C Power Controller provides a way to monitor and control the A/C power outlets that feeds the various pieces of remote station equipment. It also monitors the health of critical equipment, and automatically power cycles failed or locked up equipment. For example, it “pings” my DSL modem/router to ensure the Internet is up and networking is healthy. If the DSL router fails to respond, the power controller cycles the power and reboots the DSL modem/router device. It also monitors and manages other critical infrastructure items, like the remote station PC and VPN gateway.
Because I am not physically at the remote station much of the time, I tend to power the radio, amplifier and tuner down when they’re not in use. This reduces A/C waste, but (hopefully) adds a degree of protection against lightening or other potential issues that can occur with unattended equipment.
IT Components
These are managed IT components that are subject to the local A/C power remote management at the layer below discussed above.
- 12 VDC Supply – this supplies power to the radio, tuner or other components that operate on DC power
- Internet Modem/Router/Firewall – this component(s) provide protected access to the Internet and LAN routing/bridge functions between devices
- VPN Gateway – this device provides secure VPN Server access to the remote station. It can be a combination of software and hardware
- Remote Desktop – it’s helpful to have access to a desktop PC running at the remote station for testing, local operation, maintenance and to run various utility software (e.g., virtual COM port software that makes COM ports accessible remotely)
- Remote Utilities – virtual COM port software making COM ports accessible remotely through the VPN, rotor control, amplifier control, tuner control, VPN administration, etc.
- Security System – there’s a lot of equipment in that remote shack that you’ll probably want to protect, so a Security System, while optional, is recommended to keep your station secure, protect it from unauthorized access and use and see what’s actually happening by having a video stream showing the running equipment.
I use L2TP as the VPN protocol to connect to the SoftEther VPN Server securely from abroad. This is all that’s required for secure remote station access. I went a step further and configured my home LAN and remote station LAN into a wide area network (WAN), which is securely bridged using SoftEther. I will post more details on this networking area, but for now I recommend to start with this post on Flex Radio Community site. There’s some great YouTube videos with step by step SoftEther setup on the Raspberry Pi, as well.
RF Components
Finally, the RF Components make up the radio portion of the station. Depending upon your specific station and antenna systems, your needs will likely vary somewhat, but in general these RF components probably exist:
- Software-Defined Radio – a network-accessible radio server or SDR provides the RF foundation for the remote station
- Linear Amplifier – an optional RF amplifier to boost the signal from the radio
- Auto Tuner / Antenna Switch – an optional but highly-recommended component that enables convenient remote use of multiple antenna systems
- Rotor Controller – a network-accessible, remotely-controlled rotor controller providing remote control of rotating antenna systems
- Antenna Systems – your RF antenna systems.
The combination of RF, IT and A/C power components provide a powerful, flexible remote station architecture. You can choose which components best meet your remote station’s design goals, then mix and match the components that best meet your needs and budget.
W5FCX Remote Station Design
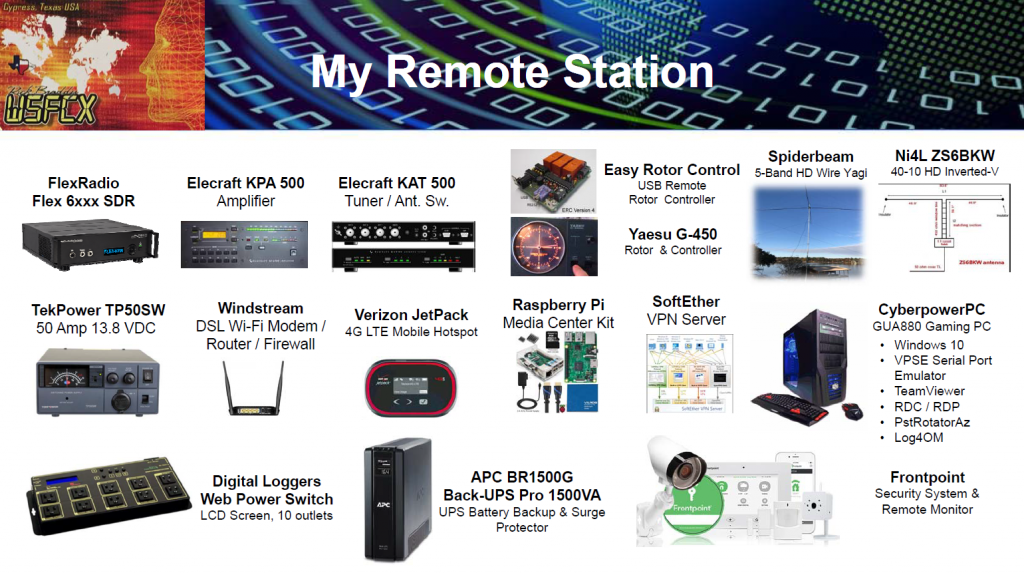
The chart below outlines the components I used when designing my remote station. Fortunately, we live in a time of great choice and options galore. I’m certain there are different, better, cheaper and more elegant ways to design a station. For me, after 45 years of inactivity, I was anxious to get going with a station that would meet my needs short-term and allow me to learn, iterate and grow the station over time. This is what I came up with…
For a relatively powerful, affordable full-function HF remote station, this could be a useful reference architecture to use as a starting point, along with the component architecture categories covered in the previous section.
My goal here isn’t to deliberately promote (or bash) any particular vendors’ products. There are many great products available. Most of these were chosen due to either their immediate availability and review ratings on eham.net or recommendations I received from others by asking around. Here’s how my remote stations is designed. Of course, I will provide my opinions in case they’re useful in some way. Naturally, I wouldn’t use anything I don’t actually like 🙂
FlexRadio Flex 6300 SDR – I have both a 6300 and a 6700 SDR. I use one of them at home (for local, limited use in my HOA neighborhood) and the other operates my remote station. I can’t say enough good things about the Flex equipment and SmartSDR software. Both are reliable and provide the SDR foundation to my remote station. I power the Flex 6xxx radio up and down using the Web Power Switch. I have had zero issues powering them up and down on a daily basis for months.
On the receive side, I have found the digital signal processing, sensitivity and filtering capabilities enable me to home in on most any signal the antenna delivers, despite what’s going on nearby. It took some learning, like anything, but once you’ve gone digital with the advanced capabilities and the ability to see the entire RF spectrum around you, you just can’t go back (at least I can’t and won’t). I notice that being my station is somewhat remote, there’s less nearby interference out in the countryside, so this improves my ears at times from what I can tell (by comparing my remote station and home stations).
On the transmit side, I routinely get comments about how great my audio sounds. I attribute that to the superb speech processing, compression and my studio-quality Samson CO3U multi-pattern condenser USB microphone, which captures quality, full-spectrum voice audio that feeds the FlexRadio. Whenever I’m using my cheap Logitech USB headset, it still works just fine, but the audio volume and robustness is just not the same. Be sure to invest in a high-quality microphone. After spending thousands of dollars on a great rig, it’d be shame to waste it with partial audio input.
Elecraft KPA 500 Amplifier – this solid-state amplifier is a beast, putting out up to 700 watts that enables me to bust through DX pileups with the big boys (in combination with the Spiderbeam). The combined gain increases from this amplifier and the antenna system have enabled me to reach distant stations being bombarded by dozens or more callers in massive pileups. Prior to using the amplifier and directional yagi beam, my inverted-v and barefoot operation rarely netted me responses to busy DX’ers. I’m delighted by the results and reports I’m now getting every day.
The safeguards built into this amplifier have saved me on numerous occasions, where I didn’t have the SWR’s tuned for some reason, had the input RF drive set too high accidentally, etc. I’m very impressed with this amplifier, which strikes me as equally high quality to the Flex radio. I have not yet tried the Elecraft SDR at my remote station, but use them at RemoteHamRadio.com and loved the audio they produce (definitely on my list of new toys!)
Lastly, I love how the KPA 500 auto-senses when I switch to a new band and automatically adjust itself for proper operation. When you’re operating remotely, you don’t have the front panel switches available, so you rely on automated actions by intelligent equipment, combined with radio buttons or other software-switches and indicators, which are available via a nice set of Elecraft utility programs.
Now, there are many other incredible amplifiers out there, as you well know. This one met my initial needs, budget and acquisition timeframe… I am looking at others that will get me eventually up to full legal limit someday, but so far, haven’t found the need for more power to do what I do.
Elecraft KAT 500 Tuner/Switch – this tuner and antenna switch is a must-have for remote operation. I use it to switch between three antennas currently:
- 5-band Spiderbeam
- 40-10 meter ZS6BKW inverted-vee
- 80-10 meter OCF dipole
This tuner is fabulous. It remembers all my prior settings and typically gets SWR’s down into the 1.1 to 1.3 range. Unless the actual SWR is greater than 7 to 1, this tuner can typically lock and load. Of course you wouldn’t want to operate under such bad SWR and CMC conditions as 7:1, but this tuner will accommodate a sickly antenna system – something to avoid. I have noticed that when a wire antenna doesn’t resonate better than 3 to 1, the reflected common mode currents can drive PC and some USB components absolutely nuts! So be careful with that 🙂
Easy Rotor Control with Yaesu G-450A Rotor – I was turned on to ERC by Scott and team at Vibroplex. What a great bunch of tremendously helpful folks, and a powerful, flexible and affordable remote rotor controller the ERC is. You can read my review of ERC on eham. The Yaesu G-450A rotor and controller have worked very well for an inexpensive, low-power rotor.

PstRotatorAz – I’m using this great remote rotator control software that works well remotely (over a remote COM port, which I’ll talk more about later) and integrates nicely with my favorite logging programs (i.e., Log4OM, DX Labs). You can manually set the azimuth, which interfaces through the ERC to drive the Yaesu rotor, or set it to Tracking mode as shown above to automatically track to the station currently entered in your tracking software. It has other cool features I haven’t even gotten into yet – very impressive and highly-recommended. Read the reviews on eham.
Spiderbeam – one of my favorite station components is the 5-band HD spiderbeam antenna and 47′ aluminum mast. This inexpensive, high-gain antenna system has enabled me to hear and work the world of DX under less than ideal (okay, downright horrid) propagation conditions we have here in 2016.
I’m very glad I went with the Spiderbeam. After having several DX and US stations running Spiderbeam antennas blow my S-meter up into 20+ range running barefoot, I was convinced it had something special going for it. Turned out to be an excellent decision. Here’s the specs:
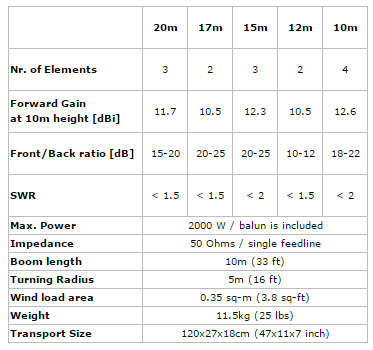
The forward gain on the Spiderbeam blows many (most?) other Yagi antennas away. The bandwidth isn’t as ideal as a SteppIR, for example, so its not as efficient across the entire band, but with that kind of gain, it doesn’t need to be…and it’s a lot less expensive and quicker to deploy than a tower with traditional yagi configuraiton.
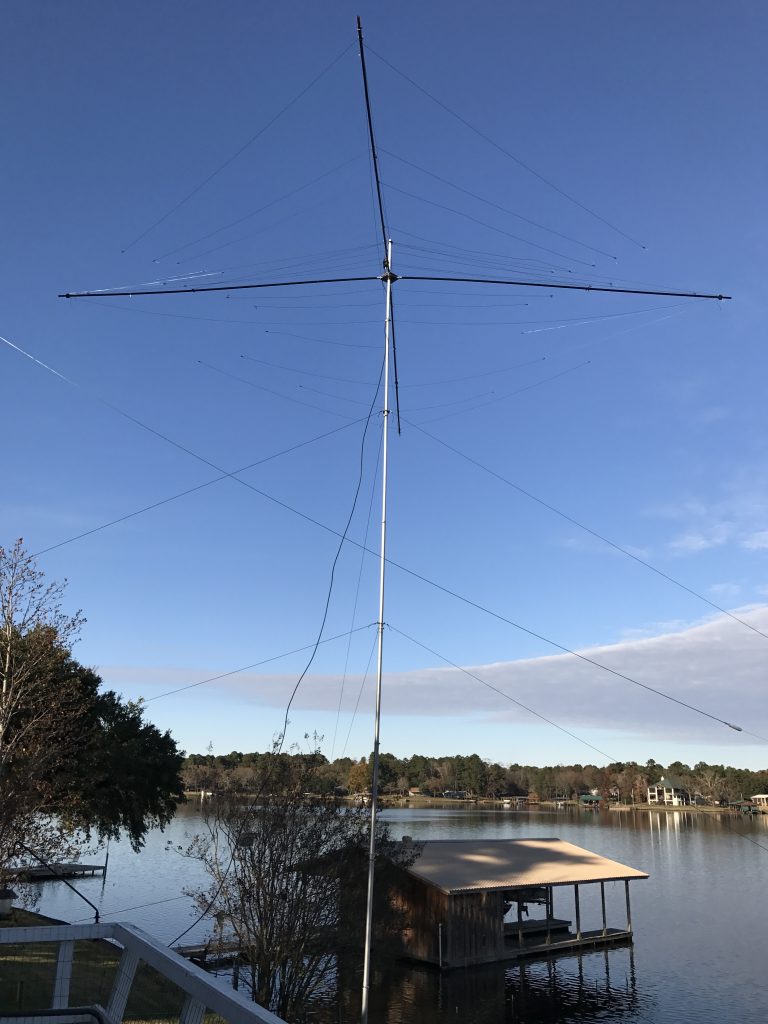
My Spiderbeam is currently up around 40 feet with open water on its east side, as you can see below. You will also notice a wire antenna with an insulator in the foreground toward the lower right side of the picture, which is one leg of the ZS6BKW dipole.
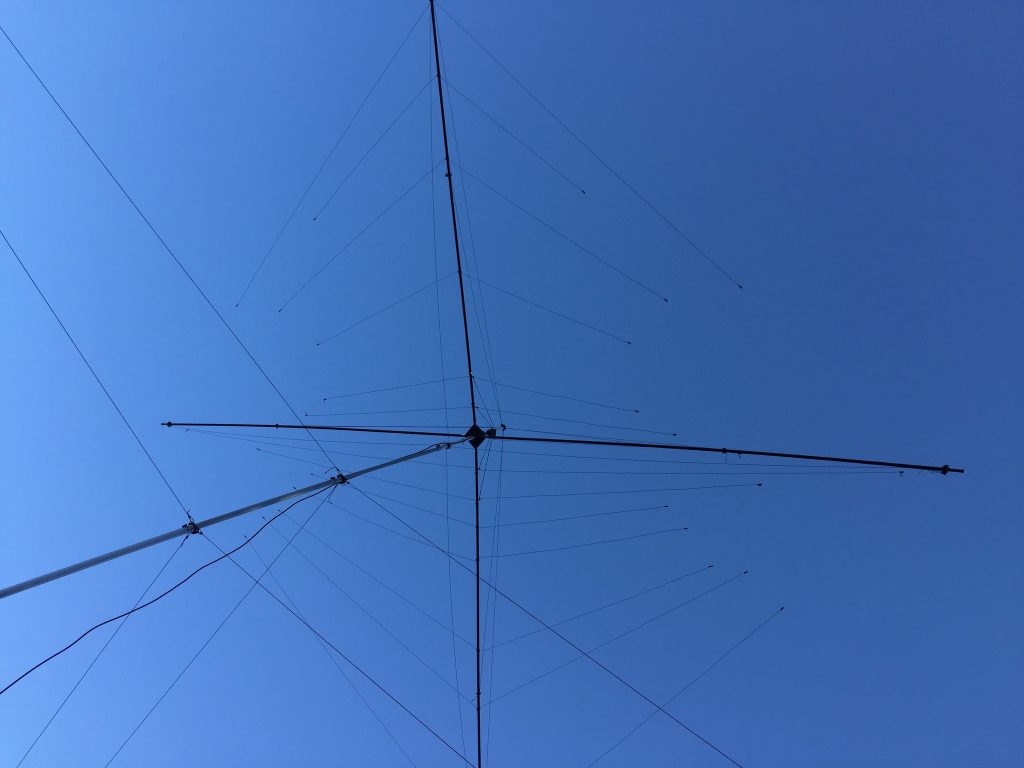
Below is a shot from beneath the spiderbeam, which shows the number of elements this wire yagi entails. Each boom is 33′ wide, so there’s a turning radius of 16.5 feet.
The antenna is mounted atop a 47′ aluminum Spiderbeam mast. Each set of guy lines attach to a guy plate with a hole in the middle that sits atop of a bushing that rests on top of a mast section. This replaces the thrust bearing found in most other tower mast configurations.
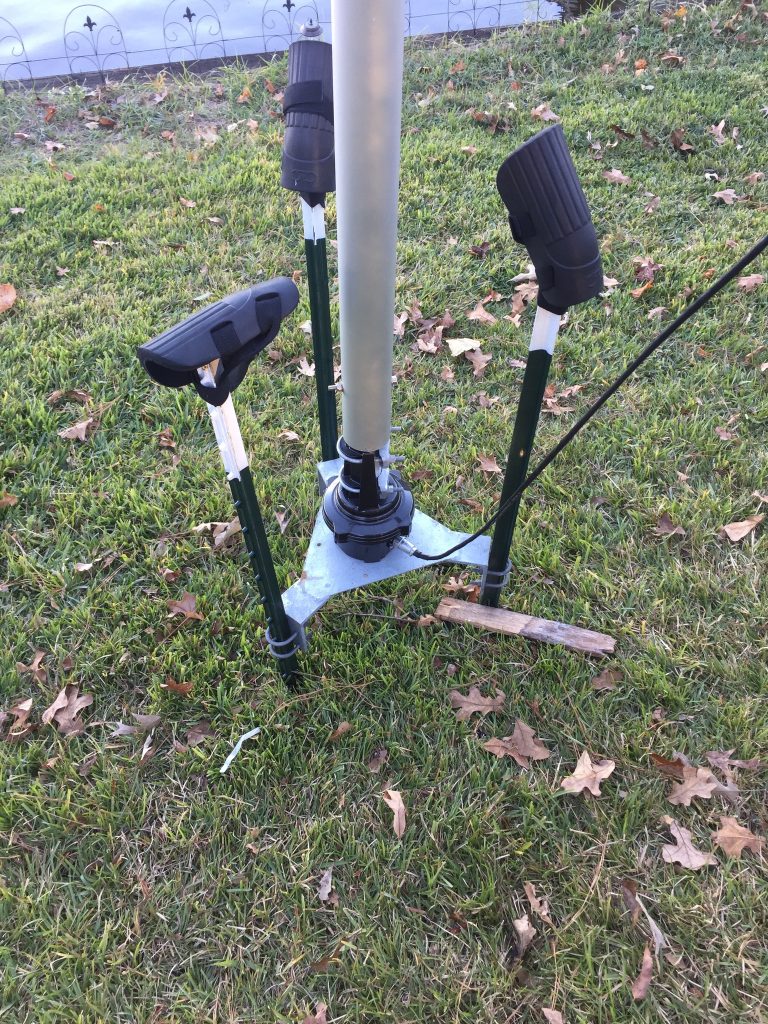
As shown below, the rotor is mounted on a Rohn tower accessory plate, as it would typically be at the top of a tower. In this case, it’s at the bottom of the mast, so the entire mast and antenna sit on it and rotate from the bottom up. The accessory plate is mounted level atop three 5 foot T-posts driven a couple of feet into the ground. The rubber knee protectors atop each T-post are there to protect against accidental impalement when working around it on a ladder. I plan to add a proper grounding rod and strap the accessory plate to it next.
I have posted extensively about the Spiderbeam here on this blog, and reviewed it on eham, so I won’t spend a lot more time on this antenna in this post. But suffice it to say, as with any station, the antenna is one of the most critical elements of the radio system, and it counts when you get it right (and hurts when you don’t) – ‘nough said. For more information on the Spiderbeam antenna, check out Rick Westerman’s (DJ0IP) fantastic website.
Ni4L ZS6BKW – the ZS6BKW wire dipole is a heavy-duty, multi-band G5RV derivative of a center-fed dipole up about 45′ in a tree. It has proven itself across 40, 20 and 17 meters. A variant of G5RV design, it has demonstrated slightly higher gain and lower SWR across multiple bands, which is why I chose this antenna design. I chose the Ni4L commercial version because of its heavy-duty construction and because I didn’t want to take the time to build one originally. Since then, I have built another (stealthy one) I’m using in my HOA restricted neighborhood with no issues. Really like this antenna for 40, 20 and 17 meters (it probably works on 15 and 10, if these bands would open up). I have found the SWR higher than my liking on 80.
TekPower TPS50SW – after having a cheap, Chinese no-name power supply fail and put out 28.8 VDC and burn up an ICOM 7300 earlier this year, I decided to invest in a quality power supply – highly-recommended. As you can see, I have learnt my lessons about ensuring the station has enough quality of power…
Windstream DSL Wi-Fi Modem/Router/Firewall – to be honest, this is the one component I truly dislike (just being honest), but I’m stuck with it for now. One of the biggest challenges with remote stations is, well, that they’re remote! And remote often equals Internet that sucks. DSL is about the sorriest form of Internet available, outside of high-latency satellite, due to its low upload speed (about 300Kb/sec) and download speed (3 Mb/sec on a good day) an unpredictable latency. This was perhaps my biggest challenge with operating remote – dealing with the limited upload speed and sporadic latency, which can sometimes become excruciating when a bunch of neighbors are running NetFlix, Amazon video and who knows what else. Fortunately, I was able to tune and optimize the SoftEther software to help overcome some of the challenges with this component.
It’s critical to have Internet service that provides at LEAST 300Kb-500Kb/sec upload (from station to your client device) and 3Mb-5Mb/sec download (to your station). Unless you have higher bandwidth than this available, you will be limited on certain digital mode programs running remote (due to excessive bandwidth required for DAX channels from what I have seen). This is an area that I can probably improve upon, given enough time and focus.
Ideally, you want 20 milliseconds or less end-to-end latency between your remote station and client devices. SmartSDR will operate at up to 120 msecs, but tradeoffs must be made at higher latency (i.e., slower waterfall update rates, slower spectrum analyzer frames per second, etc.). Use “ping” to measure your Internet latency to your station from where you intend to operate most often to see how your latency stacks up.
Needless to say, get the best quality Internet service available at your remote location. And if you can’t get better than DSL, you may want to rethink your remote station strategy. Here’s what I’m working on next…
Verizon JetPack 4G LET Mobile Hotspot – at my remote site, I get decent 4G LTE reception and transmission with the local cell towers (10Mb+/sec up, 15Mb+/sec down); however, the latency seems to be significantly higher than SDR normally likes (hundreds of msecs). I currently only use the Verizon JetPack as a fallback network to gain access to the remote PC desktop via TeamViewer or NoMachine during a DSL outage (did I forget to mention that DSL sucks?) Eventually, I hope to get SDR working through the JetPack (with more time).
Raspberry Pi – this little computer provides me with a cool Linux playground, in addition to an alternative desktop should the Windows PC become unavailable for any reason (like a failed Windows software update – it happens). Many SDR operators run SoftEther on the Raspberry Pi and use it as the VPN Gateway. It’s a handy, inexpensive computer for the remote shack that uses very little power and provides incredible flexibility and options when you need them.
Windows PC – I bought a cheap gaming PC (less than $600) from Amazon.com and combined it with an even cheaper HD monitor. This is where I run SoftEther for my VPN Gateway and the VPSE Serial Port redirector. This PC also doubles as a local operator station for when I’m onsite. I keep TeamViewer and NoMachine running on it, as well as enable Remote Desktop so I have multiple ways to access it remotely.
Sadly attempting to run the SDR over remote desktops was a dismal failure, due primarily to… you guessed, DSL limitations. Others have reported decent results using remote desktop as a means of operating a remote station. Personally, I much prefer remoting out the data layer through the VPN, which enables native SDR operation across all types of client devices without trading off functionality and audio quality.
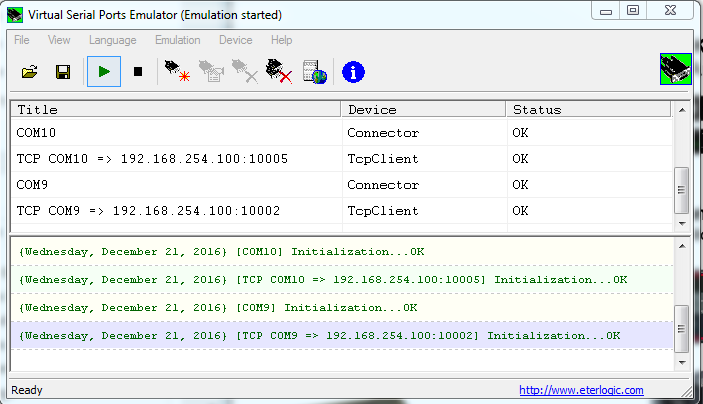
Virtual Serial Ports Emulator (VPSE) – I could not operate remotely without this little piece of software. While there are other alternatives available, this one is extremely flexible and enables me to do jumping jacks with COM ports if I need to (well, figuratively speaking). I use it on the remote station PC as a COM Port Server, where it makes USB-based COM ports from the Elecraft amplifier and tuner and the ERC rotator controller available remotely.
On the client side, VPSE maps the COM ports at the remote station to local COM ports that I can assign as virtual COM ports. This enables local software to access the serial ports to remotely manage the amplifier, tuner, antenna switch, rotator and anything else that is needed. I could also use it for remote digital modes, except… you guessed it, the DSL bandwidth isn’t sufficient for that.
Elecraft Remote Utilities – there are two utility programs for operating the Elecraft amplifier and tuner/antenna switch remotely, shown below. The top one controls the KPA-500 amplifier, and displaying the essential operational aspects such as output power, SWR, temperature, etc, along with buttons to clear faults and switch between Operate and Standby modes.
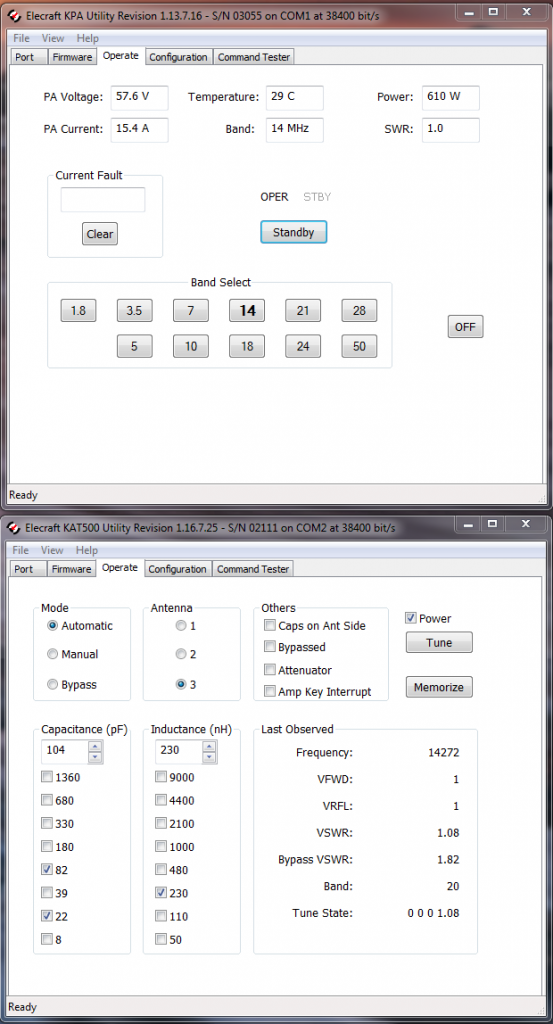
The KAT500 utility shows the current antenna switch and tuner settings, including the current auto-tuned VSWR and the actual Bypass VSWR, which antenna is selected, etc. Both of these utilities are highly configurable, enabling complete remote operation. Both operate over remote COM ports.
Logging Software Log4OM – I mostly use Log4OM for contact and QSO logging and DX Clusters. There are many alternatives available for these functions. What I like most about Log4OM is that it’s easy to use and integrates with my other software. It reports my logged QSO’s to QRZ.com and LOTW (and more), and automatically looks up a call sign when I enter it, displaying the location and SP/LP headings for rotor control. It also integrates with the Flex SmartSDR panadapter, automatically filling in the band and frequency the radio is tuned into, saving me time and hassle.
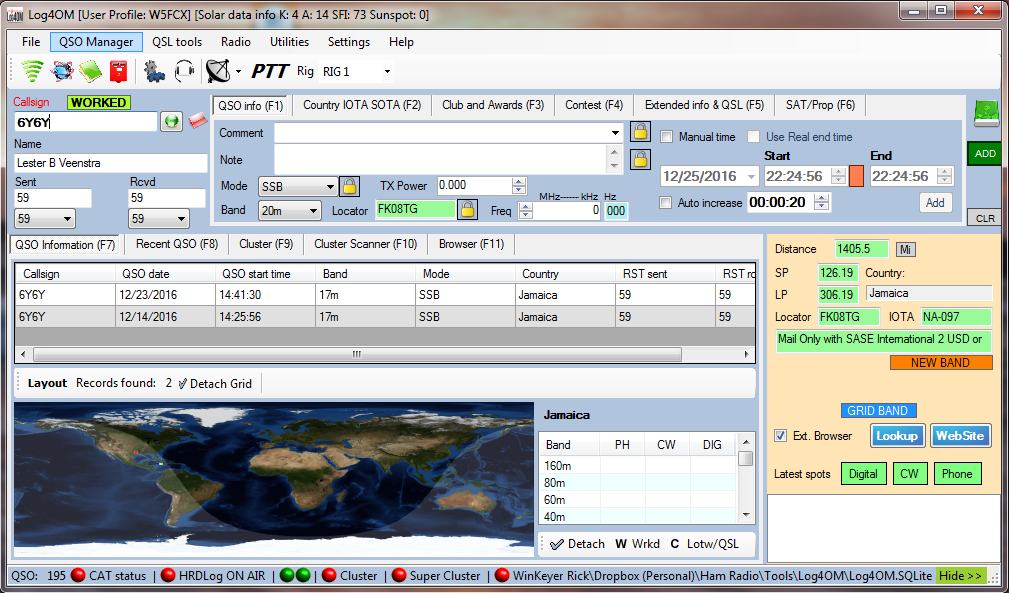
In the screenshot above, I typed in “6Y6Y”, who I have worked several times recently. It shows the short path (SP) heading from my QTH to Jamaica is 126.19. With the press of the parabolic antenna icon (to left of “PTT” in toolbar area), it sends the heading to the rotator via PstRotator and the ERC remote rotor interface board I added to the Yaesu controller box.
This all tallies up to a nicely integrated, efficient way to operate remotely from anywhere. There is another handy utility, DDUTIL, which can integrate the rotor and amplifier directly into SmartSDR. I’m not currently using DDUTIL or one of the many other helpful utilities, as I prefer to manually control the amp and tuner. With the rich set of options available for logging, rotor control, DX clustering, digital modes operations and more, there’s a nearly endless amount of customization possible these days.
UPS – it’s a decent APC 1500VA UPS – what else can I say – it works and doesn’t cause any RFI with HF reception.
Digital Loggers Web Power Switch – this extremely powerful LAN-attached A/C power outlet switch gives me total control over the station by owning the power being fed to every component.

As you can see from above, I’m using 6 of the 8 outlets. I now see that I have the KPA 500 also plugged into it (a change from the original configuration).
I highly recommend this web power switch, which has a great web user-interface for controlling your station. It also has “ping monitor” capabilities, so I have it monitoring my Windows PC and DSL Modem. If they fail to check in during periodic network checks, the power controller will automatically “cycle” the power on that A/C outlet, forcing a reboot and restart, which recovers from most typical glitches that can occur occasionally. And in the event of a lengthy power outage that exceeds the UPS run time, when power is restored this intelligent power controller will restart all critical components (i.e., DSL and PC) in a predetermined sequence with proper delays between each.
FrontPoint Security – Now that I operate the remote station, I decided that it’s time to add security and surveillance to the property. In addition to costly equipment increasing theft risks, there are now more things that can go wrong with nobody around, so it’s comforting having 24 x 7 monitoring with motion sensors, a smoke alarm and surveillance cameras. It’s only about $50 a month to protect the property, and when considering the investments at risk, additional security provides at least some peace of mind (and an insurance discount).
Summary
So in summary, I’m having a great time with my remote station and recommend remote radio operation to those with a need (like my HOA restrictions), a desire for anywhere, anytime access to your radio (even at your existing home) or just bored to tears with nothing else better to do than experiment with one of the latest frontiers in amateur radio!
Did I mention you can do this at home? Yes, for you “remote” may be operating from your couch, back porch or in the car or boat (assuming you have a 4G connection). You can use these same techniques to make your home station remotely accessible, so it doesn’t have to be a physically remote location such as what I and others have. Many SDR users travel a lot, so having remote access capabilities is the difference between having access to an HF rig or not.
I hope you enjoyed this post and get some value from it. I will strive to post more details in certain areas that I know need it – like a block diagram, the VPN and COM port setup and other configuration details. If you decide to head down this remote station path and run into roadblocks or questions, feel free to reach out by posting comments here.
Until then, happy hamming!
UPDATED 12-30-2016
Received some questions about other details, like the remote station cost, so there’s now a post with parts list details and cost estimates available.
In going through the parts list exercise, I realized I forgot to mention something that may be important. In researching the station design, I decided to go with the higher cost, lower LMR-400 coax vs. more traditional RG8X or equivalent. The loss per 100 feet is less than half of RG8X coax, which may not seem like a lot, but when you’re trying to hear a faint DX signal, it may mean the difference in hearing them or not. Yet another of the many considerations when building a station.


Recent Comments